Gretsch Streamliner modification project

User avatar
olrocknroller
Top Producer
Posts: 810
Joined: Mon Jul 26, 2010 1:22 pm
Location: Canada
Contact:

Re: Gretsch Streamliner modification project

Postby olrocknroller » Sun Jun 19, 2011 11:46 pm

Mr. Bill wrote:OK, now I see that there is a channel for the truss rod to pull against, and the dark wood (mahogany?) is a spline that connects the two sections of the neck. The spline seems to be in reasonable shape. Why should you replace it?

You should replace the strip of wood that levels out the truss rod channel to the gluing surface of the neck. This will keep the glue from the fingerboard from fouling the truss rod and channel.

Just my 2 cents.


That's definitely a different set-up for a truss rod... I use the StewMac dual truss-rod in my necks... It has a brass end-section that creates it's own lever block at the ends of the neck. One thing I do when gluing on the fingerboard is apply a strip of masking tape over the truss rod, apply and smooth the glue, then pull off the tape just before clamping the fingerboard in place...haven't had a glue-fouled truss rod yet...
Olrocknroller

User avatar
oigun
Top Producer
Posts: 437
Joined: Thu Jan 07, 2010 3:48 pm
Location: Netherlands
Contact:

Re: Gretsch Streamliner modification project

Postby oigun » Mon Jun 20, 2011 12:07 am

Yes the "dark piece" connects the overhang to the neck, Its common in archtops that the extension piece is added later. Its more easy to make the neck-joint that way.
Often it is done like this:
Image
But maybe for gretsch it was a better or more economical construction to glue in a spline...(maybe they did both to avoid the 15th fret hump..??)

User avatar
Sarah93003
Master Contributor
Posts: 3810
Joined: Tue Mar 10, 2009 4:26 pm
Location: Westlake Village, CA
Contact:

Re: Gretsch Streamliner modification project

Postby Sarah93003 » Mon Jun 20, 2011 6:46 am

Cool picture, Oi. It makes perfect sense when you see it like that.

I've heard of putting tape over the truss rod to be sure not to get glue in there. When I removed the fretboard I saw that on this guitar they had laid in a long strip of veneer over the truss rod in that rout channel. I suppose for the same purpose. It came up with the fretboard since it was glued to the back of it.

I am guessing that they put the veneer in to keep any glue out as well as keeping the truss rod from rattling. It seems to me that it was likely above the top surface and then sanded along with the neck before gluing on the fretboard.

You can see the veneer here.

Image
____________________
1965 Mosrite Celebrity Prototype with Vibramute
1972 Mosrite Celebrity-III
1977 Gibson MK-53
1982 Fender Bullet
1994 Gretsch Streamliner G3155 Custom
2005 Gibson Les Paul Standard Plus
2006 Jude Les Paul 12 String

Mr. Bill
Top Producer
Posts: 678
Joined: Tue Aug 19, 2008 12:15 pm
Location: Chicago, IL
Contact:

Re: Gretsch Streamliner modification project

Postby Mr. Bill » Mon Jun 20, 2011 9:11 am

Sarah, was the original strip just a veneer (same thickness end to end) or was it a shaped piece that was thicker in the middle?

User avatar
Sarah93003
Master Contributor
Posts: 3810
Joined: Tue Mar 10, 2009 4:26 pm
Location: Westlake Village, CA
Contact:

Re: Gretsch Streamliner modification project

Postby Sarah93003 » Mon Jun 20, 2011 10:08 am

Mr. Bill wrote:Sarah, was the original strip just a veneer (same thickness end to end) or was it a shaped piece that was thicker in the middle?


it looks the same, end to end.
____________________
1965 Mosrite Celebrity Prototype with Vibramute
1972 Mosrite Celebrity-III
1977 Gibson MK-53
1982 Fender Bullet
1994 Gretsch Streamliner G3155 Custom
2005 Gibson Les Paul Standard Plus
2006 Jude Les Paul 12 String

User avatar
Sarah93003
Master Contributor
Posts: 3810
Joined: Tue Mar 10, 2009 4:26 pm
Location: Westlake Village, CA
Contact:

Re: Gretsch Streamliner modification project

Postby Sarah93003 » Sat Jul 02, 2011 9:36 pm

Here is this weeks update.

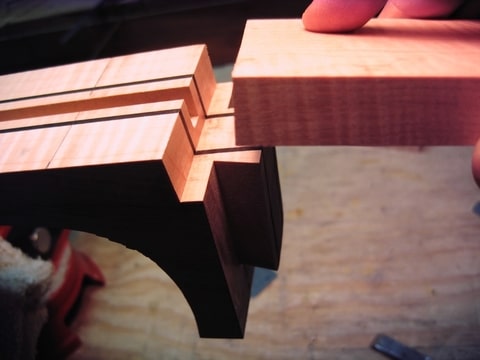
A few days ago I finally figured out how to get the remaining glue off of the neck. I had been chipping at it with a razor blade and it was very slow progress. Hide glue really sticks! I didn't want to put the heat gun to the neck again for fear I might burn it. So, it finally occurred to me to heat up a stiff putty knife with the heat gun and use the hot knife to remove the excess glue. It worked perfectly. All I need to do now is some light block sanding and the neck is ready for the fretboard.

Time for some cosmetic surgery.

First I covered the surface with masking tape so I'd have a nice surface to work from and not scratch any of the painted surface. Even though I'm going to paint the guitar I still want to be careful with the surface.

Image

Using an exacto knife I cleared the tape from the opening of the existing pickup holes. I also had to establish the center line of the guitar. With the help of my roommate and some fishing line I was able to do that. The existing two holes are too small to accommodate the P90 pickups so they will have to be enlarged as well. I marked out the three holes onto the tape.

Image

Using an exacto knife again, I scored through the tape and through the clear finish of the guitar. I don't know if it was necessary but I did it just in case so when I used the router and wouldn't cause the clear finish to chip.

Image

I removed the tape from the area so I could clearly see my lines when using the router.

Image

This is my Bosch Colt. I really like this router. I just used a standard 1/4" straight bit.

Image

The two existing holes are easy since there is a big ol' hole to begin with. Next I drilled a large pilot hole for the center pickup hole.

Image

Well, I'm satisfied with the placement of everything. It's time to rock-n-roll!

Image

I started with the bridge pickup hole. It was actually very easy to do with the router. I did remove the bridge pins so the router woudn't hit into them.

Image

I dropped the pickup into place just to be sure it fit between the lines. Nice and snug!

Image

So far, so good. I decided to do the neck pickup second and save the middle pickup position for last. Because the neck is on the guitar I had to actually place the router base on the neck and extend down into the hole. The router bit was plenty long enough and it worked like a charm. I had my roommate hold the bout steady just to be safe.

Next was to cut out the middle pickup hole. It took longer simply because there was a lot more material to remove. Okay, all three are cut out.

Image

A quick test fit to be sure all three fit as they should.

Image

I took the tape off and the surface looked great. No chipped finish! I put the pickups back in one more time just for the effect.

Image

I like it!
____________________
1965 Mosrite Celebrity Prototype with Vibramute
1972 Mosrite Celebrity-III
1977 Gibson MK-53
1982 Fender Bullet
1994 Gretsch Streamliner G3155 Custom
2005 Gibson Les Paul Standard Plus
2006 Jude Les Paul 12 String

User avatar
Veenture
Master Contributor
Posts: 4127
Joined: Sat Jan 03, 2009 12:07 pm
Location: The Netherlands
Contact:

Re: Gretsch Streamliner modification project

Postby Veenture » Sun Jul 03, 2011 12:38 am

Sarah, fascinating to watch 'over your shoulder' as you go along! Actually, I like the finish as it is presently 8-)

User avatar
JimPage
Top Producer
Posts: 984
Joined: Thu Jul 30, 2009 11:26 am
Location: Washington DC Metro Area
Contact:

Re: Gretsch Streamliner modification project

Postby JimPage » Sun Jul 03, 2011 3:34 am

Wonderful job, Sarah! I'm with Paul on the finish. I think it looks nice, especially with those black pickups.

--Jim
Image
• '99 Martin D-41
• '67 Mosrite Celebrity II
• '72 Mosrite Celebrity III
• '83 Tokai TST56
• '10 Hallmark Barris Krest
• '10 Hallmark 60 Custom
• '10 Hallmark Stradette
• '50s Tele Clone
• Basses: Ashbory, Hofner, 51RI Precision, 5-string, fretless

User avatar
olrocknroller
Top Producer
Posts: 810
Joined: Mon Jul 26, 2010 1:22 pm
Location: Canada
Contact:

Re: Gretsch Streamliner modification project

Postby olrocknroller » Sun Jul 03, 2011 8:36 am

Nice work Sarah! You have incredibly steady hands to do that kind of work freehand! I always manage to "color outside the line" when I get a power-tool in motion, thus my heavy reliance on the milling machine.

The finished job looks great...you've done such a good job, I see no need to go immediately to refinishing, unless of course, you hate the present color!

Now, for that second set of "eyes" to be cut...
Olrocknroller

User avatar
MWaldorf
Site Admin
Posts: 3264
Joined: Sat May 24, 2008 1:21 pm
Location: Alameda, California
Contact:

Re: Gretsch Streamliner modification project

Postby MWaldorf » Sun Jul 03, 2011 9:14 am

Great work, Sarah!
Oy vey - it's MESHUGGA BEACH PARTY - The world's premier Jewish Surf Music Band!

Image

What? Couldn't tell the logo is a link? So click here, what's the hold up? http://www.meshuggabeachparty.com


Return to “Other Instruments, Equipment, Accessories & Projects”

Who is online

Users browsing this forum: No registered users and 98 guests