Danny;
Great job.
What did you decide as far as neck radius ?
Dan
Blackguard Telecaster
-
panther

- Top Producer
- Posts: 817
- Joined: Tue May 03, 2011 8:31 pm
- Location: Anza, California
Re: Blackguard Telecaster
"The More People I Meet, The More I Miss My Dog"
-
dubtrub
- Administrator
- Posts: 3852
- Joined: Sun May 04, 2008 10:12 am
Re: Blackguard Telecaster
panther wrote:Danny;
Great job.
What did you decide as far as neck radius ?
Dan
It's the vintage spec'd neck with the 7 1/4" radius.
If anyone is interested in a case for their Tele, I got one of these inexpensive cases from Rhondo Music and replaced their funky handle to bring it more inline withe the original poodle case. http://www.rondomusic.com/egc350brngld.html
Danny Ellison
-
panther
- Top Producer
- Posts: 817
- Joined: Tue May 03, 2011 8:31 pm
- Location: Anza, California
Re: Blackguard Telecaster
Danny;
Thanks for starting afire under me. I've decided to finish my Blackguard. I'm going with Re-Ranch traditional Fender Butterscotch, and amber on the neck. One question. Is the fretboard coated with clear finish, or is it left alone ?
Dan
Thanks for starting afire under me. I've decided to finish my Blackguard. I'm going with Re-Ranch traditional Fender Butterscotch, and amber on the neck. One question. Is the fretboard coated with clear finish, or is it left alone ?
Dan
"The More People I Meet, The More I Miss My Dog"
-
dubtrub
- Administrator
- Posts: 3852
- Joined: Sun May 04, 2008 10:12 am
Re: Blackguard Telecaster
panther wrote:Danny;
Thanks for starting afire under me. I've decided to finish my Blackguard. I'm going with Re-Ranch traditional Fender Butterscotch, and amber on the neck. One question. Is the fretboard coated with clear finish, or is it left alone ?
Dan
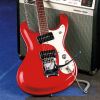
Glad to have inspired you to finish your guitar.
Also, to get the action really low like on a Mosrite, it was necessary to level and re-crown the frets as well as smooth up the edges before it was really comfortable.
Just to get you more motivated here's a couple more shots.


Danny Ellison
-
panther
- Top Producer
- Posts: 817
- Joined: Tue May 03, 2011 8:31 pm
- Location: Anza, California
Re: Blackguard Telecaster
Danny;
Could you describe the system used, and grits of paper, for the wet sand portion of the body. How many toner coats, and how many finish coats. Did you sand between toner and finish coat.
Dan
Could you describe the system used, and grits of paper, for the wet sand portion of the body. How many toner coats, and how many finish coats. Did you sand between toner and finish coat.
Dan
"The More People I Meet, The More I Miss My Dog"
-
dubtrub
- Administrator
- Posts: 3852
- Joined: Sun May 04, 2008 10:12 am
Re: Blackguard Telecaster
(1) Start out spraying several medium coats of lacquer sanding sealer waiting about 3-5 minutes between coats. Let it dry overnight then sand it smooth with fine grit dry sandpaper. Spray several more coats of sealer and repeated the process for a total of four applications.
"I was trying to seal as much of the open grain as possible as I didn't use any grain filler. Grain filler, if you can find it (which I couldn't) would have saved all those extra coats of sealer. I never did get all the grain filled and the slightly opened grain shows through on my finished product when held towards the light. Personally it doesn't bother me and actually gives it character."
(2) Spray on a tack coat of the butterscotch color coat. After that sets for about ten minutes come back with several light to medium coats. Be careful not to spray too thick and hide the all the pretty wood grain as you will do this process one more time. Let that dry for a couple of days then wet sanded with 400 grit, using water containing a drop of dish soap. The dish soap prevents the build up of dried lacquer residue on the sandpaper. After sanding, spray on another tack coat followed by a couple more light to medium coats of color until you achieve the transparency you desire. Let that dry for a few days then sand again. Be careful not to sand through the finish and be extremely careful when sanding near and around the edges.
"I used a rectangular rubber pencil eraser to keep then sanding process nice and flat/level."
(3) Now it's time for the clear coat. Follow the exact same process as with the color coat except spray it on fairly heavy after a good tack coat has been applied. Be careful of developing runs if sprayed too thick. After about three applications of clear, letting it dry and sanding between coats, allowed it to cure for about seven days (some recommend 30 days) then wet sanded with 600 grit then 1200 grit wet sanding paper. Caution: do not use spray cans of Deft or Krylon clear lacquer or Dupli Color acrylic clear lacquer as it will never dry hard.
(4) Polished it out using Meguiars fine grit polishing media.
(5) Next step, assemble and play.
Danny Ellison
-
panther
- Top Producer
- Posts: 817
- Joined: Tue May 03, 2011 8:31 pm
- Location: Anza, California
Re: Blackguard Telecaster
Danny;
Thank's for that tutorial, now I feel confident to obtain a good finish. Before I seemed to hurry the process, and never obtained the finish I desired. Thanks for the Deft/Krylon warning. I did buy Re-Ranch Nitro finish, will one can be enough, or should I have purchased 2 ? OR do you have a cheaper acceptable brand ?
Dan
"The More People I Meet, The More I Miss My Dog"
-
dubtrub
- Administrator
- Posts: 3852
- Joined: Sun May 04, 2008 10:12 am
Re: Blackguard Telecaster
One can of each should be enough of the ReRanch products. You might need a little more of the clear. I gave up on finding a decent aerosol can of clear locally so I don't know for sure what to advise there. Maybe go to a store that carries Sherwin Williams, Mohawk or some other commercial brand. The local Home Depot, Lowes and Ace Hardware stores didn't have anything I found that would dry hard. That's why I stay with a compressor and spray gun. Sorry! Maybe check the ReRanch forum  http://reranch.com/reranch/ or Tele forum and see what you can find. http://www.tdpri.com/forum/finely-finished/
Good luck and keep us posted. Photos are always nice.
Good luck and keep us posted. Photos are always nice.
Danny Ellison
-
BRRanger

- Top Producer
- Posts: 645
- Joined: Tue Sep 18, 2012 10:14 am
- Location: California/Central Valley
Re: Blackguard Telecaster
Thanks for the finishing tips Danny! I'll use that technique on my next project. I've done two paint jobs so far, and cleared two necks... a black to red to yellow sunburst, and a Rickenbacker red to clear...both came out nice (to my suprise) but I didn't go through all the steps you mentioned. Plan to do a butterscotch/blond finish on a Ventures model and will follow your instructions.
Scott
Scott
-
dubtrub
- Administrator
- Posts: 3852
- Joined: Sun May 04, 2008 10:12 am
Re: Blackguard Telecaster
BRRanger wrote:Thanks for the finishing tips Danny! I'll use that technique on my next project. I've done two paint jobs so far, and cleared two necks... a black to red to yellow sunburst, and a Rickenbacker red to clear...both came out nice (to my suprise) but I didn't go through all the steps you mentioned. Plan to do a butterscotch/blond finish on a Ventures model and will follow your instructions.
Scott
You are welcome! These are the basic steps I always use. They are not set in stone as everyone has their own technique but this has always worked for me.
Danny Ellison
Return to “Other Instruments, Equipment, Accessories & Projects”
Who is online
Users browsing this forum: No registered users and 81 guests